
This page describes how you can use a small AVR device and a real-time clock (RTC) to build a hot-pluggable USB real-time clock (I've named it just usb-rtc), mainly for usage with ultra-low-cost hardware meant to be used with Linux.
The overall cost for one of those thingies I'm describing here is about 15€-20€, which isn't really cheap. But I find it a valuable thingy because the result is a hot pluggable RTC, usable by almost any device which has USB. So it's very likely you will use it for much longer than the device you currently want to build or search it for. In addition you might want to use it as a (hot pluggable) USB-I2C adapter too. The software I'm describing below already supports that.
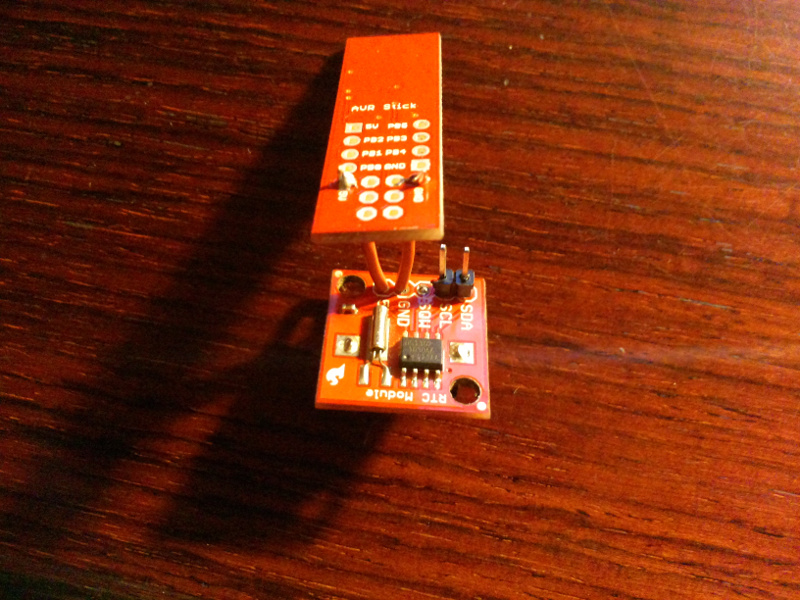
To give you an impression about how it might look afterwards, here are some pictures of the ones I've build:
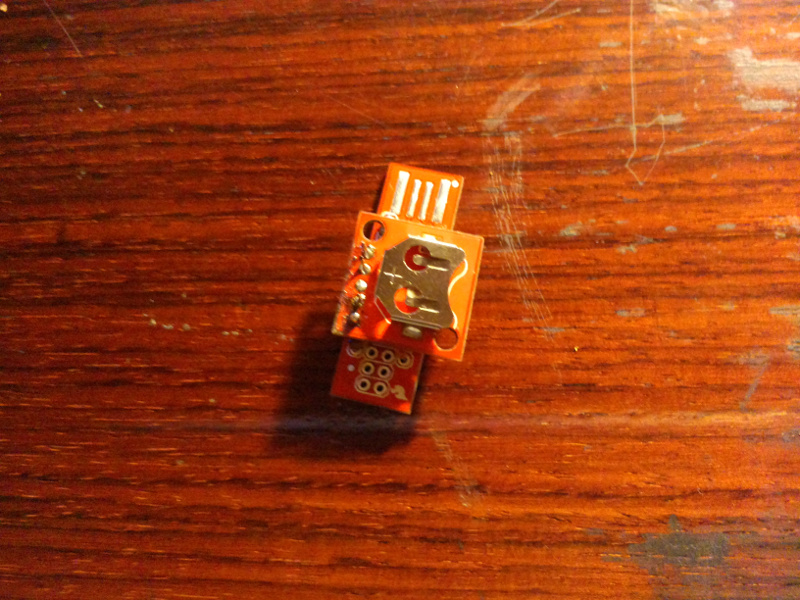

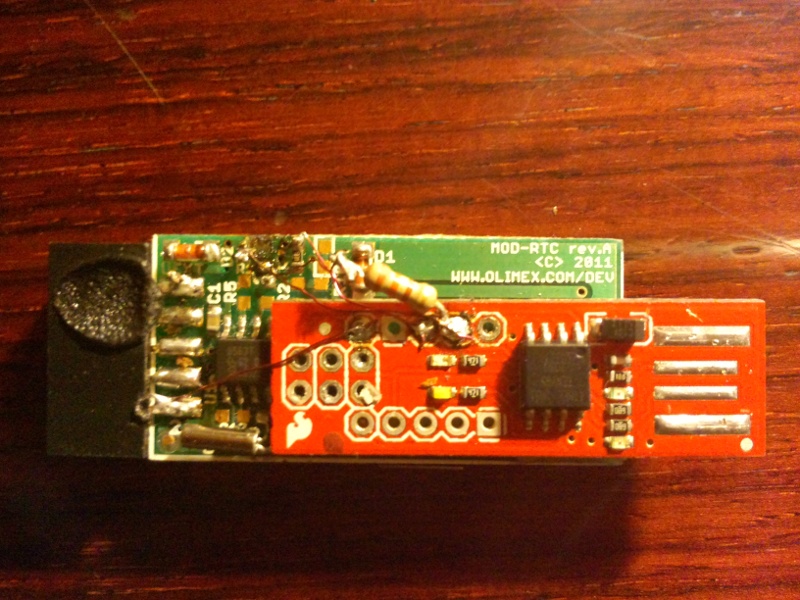
(Don't get confused because of the mess and the resistor in the picture with the MOD-RTC, that isn't normal and is solely my fault, see below for an explanation.)
If you are a perfectionist, hardware developer or want to use such a device in some production environment, be warned: everything I'm describing here breaks several rules, so it's very likely you don't want it. E.g. the USB solution is bit-banged (implemented by software only) which likely breaks several requirements defined by the USB Implementers Forum. And for the I2C connection I don't even use (external) pull-up resistors, which normally are necessary.
So everything might have a bad taste for you, but as a homebrewn solution for cheap devices without a RTC, a quick'n dirty device I didn't want to spend much time for building it, it just works. At least for me and most of the time. ;)
Of course, I can't guarantee that it will work for you too, so think twice before you buy the necessary parts. I'm not responsible for anything if you build your own copy.
Just to be clear, so that no misunderstandings may arise: I have done the things I'm describing here in my spare time, I wasn't paid by anyone to do this and I don't have any financial interests in publishing these steps. See it as a gift and don't bother me with sentences like "You have to do this and that." or "You have to help me, ...". And, please, forgive me if I won't answer to an e-mail.
I own several ARM boards which are meant to be used with Linux but which don't have a RTC. Their developers or their managers seem to live in some timeless universe I can't reach. ;)
No, really, either the hardware developers of those devices just never really use them themselves, they like to save the last 2¢, or they got forced by their managers to save the last 2¢ they can think about. But even while we now live in times where everyone and everything seems to be connected with some clouds, I personally just find it a pain to regulary use a device which doesn't have a real-time clock and must have to depend on some network connection if it wants some useful meaning about the current time.
Examples for such devices I know about are the DockStar or GoFlex Net from Seagate, the devices from Pogoplug, the Rasberry Pi or the BeagleBone, just to name some of them (I don't own all of them).
Also such a RTC is most often only needed at boot time, and might be even replaced by using NTP (if you think you are always connected), the time will likely come where Murphy will tell you that all your assumptions were wrong. And usually Murphy will tell you that at some time you most likely never expected nor wanted it.
As hardware I've decided to use something based on those small AVR devices from Atmel and some RTC devices I already had.
I've build something like the one I'm describing here (using breadboards) already several years before, when I've first seen Igor Cesko's IgorPlug. If you are curious, here is a picture of such a breadboard I've build at that time:

If I remember correctly, the solution from Igor Cesko is the mother of all those bit-banged USB AVR solutions, which are floating around today. But it is such long ago (almost a decade now), my memories might be wrong. Anyway, cudos to him.
Instead of building something again by myself, I've decided to go the lazy route and just bought me a couple of those AVR Sticks (part number 9147) from SparkFun.
If you are living in good old Europe and wondering where to get those AVR sticks here, you might try to send a friendly mail to the very friendly people from Watterott, where I usually buy most of my hardware hacking tools. They were at least that kind to order those sticks for me, maybe they will do it for you too.
As real-time clocks I'm describing the usage of some ready-to-use modules with a RTC chip and a battery holder. One is the Real Time Clock Module (part number 99), again from SparkFun, the other is the MOD-RTC from Olimex.
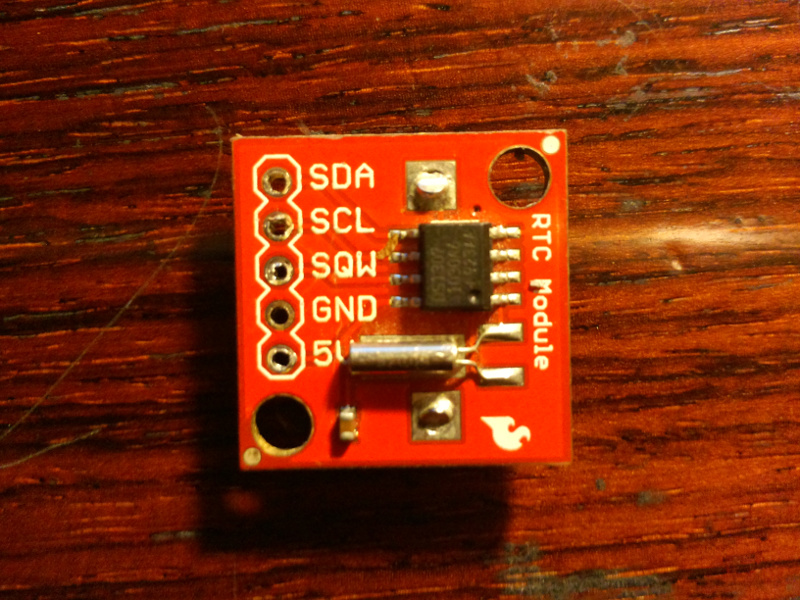

Both modules are using I2C for communication. The one from SparkFun uses as chip a DS1307, the one from Olimex a PCF8563. If you decide to build the device with the MOD-RTC from Olimex, which is also usable with 3.3V and not only with 5V as the module from SparkFun, don't forget to order a coin battery too. In contrast to the Real Time Clock Module the MOD-RTC comes without a coin battery.
We start with building the necessary software. Only one component is really necessary, the firmware for the AVR Stick. The modified host driver for Linux is optional, but I would higly recommend it to get the real time before the file system is touched.
As firmware for the AVR Stick I'm using i2c-tiny-usb from Till Harbaum (thanks for that).
Some patches are needed to use it with the AVR Stick, I've took the necessary stuff from the firmware for the AVR Stick as offered by SparkFun. SparkFun itself used the V-USB software from obective development, so it's a nice example about how open source works, everyone is copying from everyone. ;)
As build environment I will only describe how to do it with Linux, as this is the OS I'm using almost all the day since more than a decade. You will need to install a cross-compiler for AVR devices (avr-gcc), otherwise nothing special is needed. Read the documentation of your distribution about how to install it. E.g. for Fedora this can be done by
for Gentoo this is accomplished by
Now we are ready to fetch the firmware for i2c-tiny-usb and putting it into a git repository to track our changes. All is done by some simple steps:
The repository is ready and we can proceed with the next step.
As already said, the patches for i2c-tiny-usb are just some code taken from the original firmware for the AVR Stick. To make it easy for you, I've made a final patch to merge them, so again, just some simple steps are necessary:
Finally you can build the firmware:
and add it to your repository (just in case you want it without having the need to compile it again, compilers do change and you might be forced to modify the source if you want to compile it again some time in the future).
Done. We now have the firmware. Wasn't that easy? ;)
This step isn't necessary, if you don't want to do it right now, you can just proceed to program your device.
This patch is needed if you want to let the system have the time before it touches the filesystem or the userspace starts (at least if you don't use an initrd). It adds a parameter named devices to the i2c-tiny-usb driver. See below at 'Using the device' about how to use it.
Unfortunately the kernel maintainers didn't like it, so here it is: i2c-tiny-usb.patch
I don't explain the neccessary steps to include that in you kernel, otherwise I wouldn't have taken the usual pain trying to get a patch into the mainline kernel. So you are on your own with that. Here is just the outline of some steps to do this with a stable kernel from kernel.org:
Just a side note if you ever want to get a patch into the mainline kernel. Sleep several hours before you send it, because it's very likely that you will receive a mail from someone which tells you, in some more or less verbose written speak, that you are a dumb fool, trying to do stupid and silly things.
And after you've received such a mail, sleep again before you write an answer. There are more people there than you might be able to discuss with, so be prepared just to become silent if you don't want to write mails all the day just to defend yourself or to get some few simple lines into the kernel.
And in the following discussion they will first request that you solve a problem which is in fact unsolvable and later on they tell you how you have to tie your shoes. ;)This now happened to me more than once with different people (at different times), so I know about what I speak. I'm sure not all devs there are of the same type (I've also had some good experiences), but at least several of them behave like that. It's a very rough climate there, I'm not sure why. Maybe it's necessary to get heared in such a large developer community or it's just some outcome of the many (maybe really silly) patches, some of the maintainers have to process. Or it's some type of work-related disease, I don't know. Just don't get upset or even depressed if you receive such mails. That happend to many more people than just you. ;) And be patient (even simple one-line bugfix patches may need half a year).
E.g. in case of the above small patch (in a version usable by all i2c-bus-drivers), the maintainer of the i2c-subsystem first greeted me with a friendly "No, no, no!", didn't have a look at the source at all, requested something unsolvable and then did come up with some artificial arguments. And the maintainer for i2c-tiny-usb (the author itself) suggested that I write a whole driver. I assume he thought I want to write a thesis about "Hot pluggable real-time clocks for embedded systems using the Universal Serial Bus" or similar or that I'm bored as hell, having nothing else to do. I don't know.
So my suggestion is: Just leave your patches in whatever style you prefer (real developers can read every source regardless which style it is written in, non-developers even don't try to read it) and just publish them on your blog, website or wherever search engines will find it. Everything else might be just an enormous waste of time you could better spend in doing things you really do care about.
Of course, all might be my fault and maybe I'm really a simple mind trying to do foolish and stupid things, but I prefer to not assume such. ;)
Programming the device will be done by using avrdude. It is available in almost every Linux distribution, so just use your usual steps to install it.
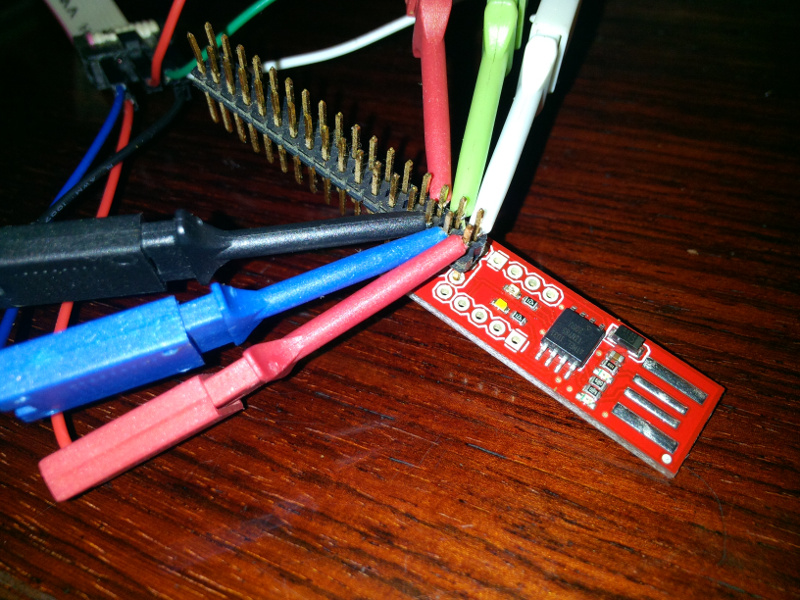
You need an AVR ISP programmer. I'm using one of those many derivates from USBasp (again a bit-banged USB AVR solution), but any other will do the trick too. The problem you now will face is how to connect it to your shiny stick. Fortunately it isn't as complicated as it might look at first. You even don't have to solder something.
The first solution (if you have a programming cable with a 2x3 socket) is by just using one 2x3 or two 1x3 male headers. Stick them into the AVR Stick, attach the socket and go on. It might look like that:

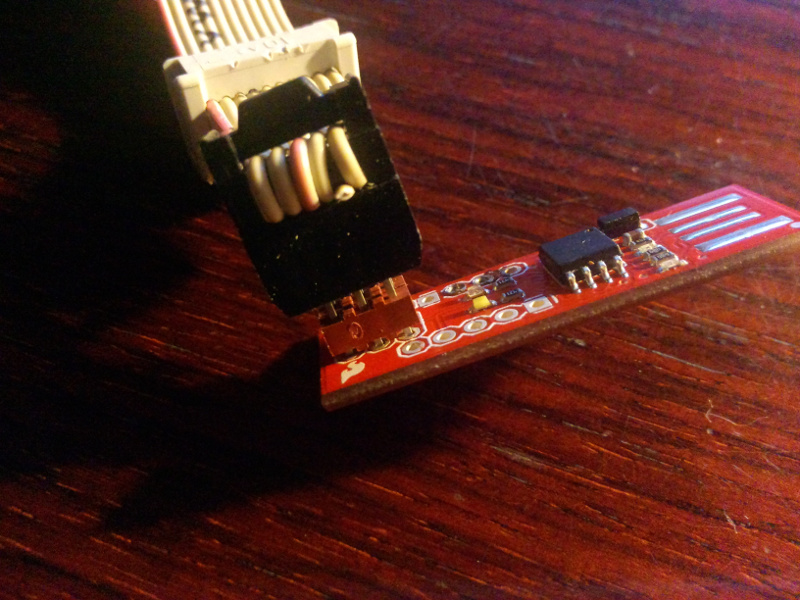
The second solution, if you don't have a programming cable with a small 2x3 socket but one with a 2x5 socket, is by using some cables like I have it done here:
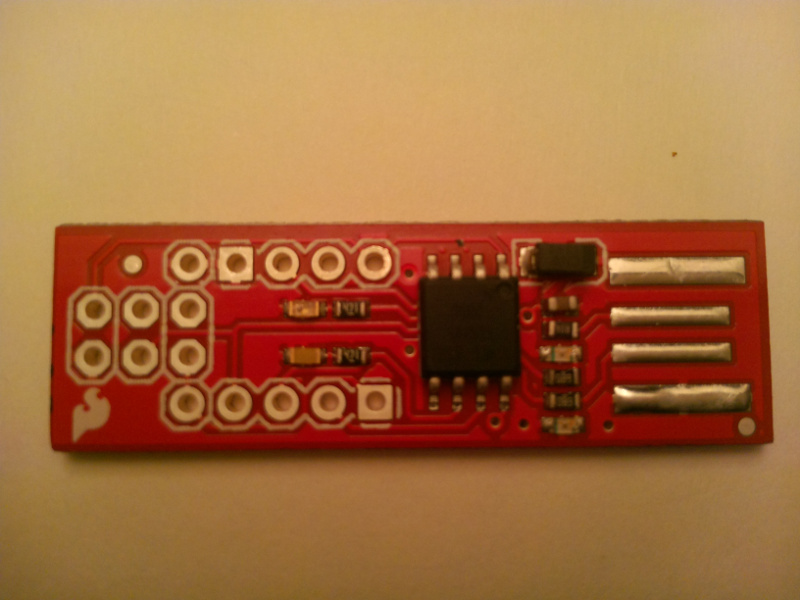
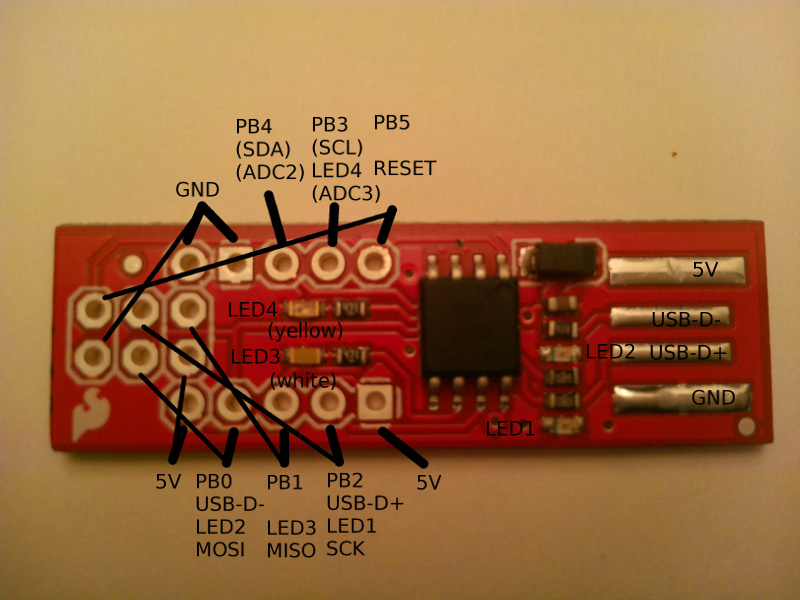
If you do it like that, the following labeled picture from the AVR Stick might become handy to connect the cables as needed:
After you've connected the device I suggest to first make a backup of the firmware on the device. This also verifies the connection. Depending on which ISP programmer you are using, you have to replace -c usbasp with whatever is neccessar for your programmer. Just use
to let avrdude list all programmers it knows.
The steps to make a backup:
After you've made a backup (and have verified you don't have got some errors), you finally can program the firmware. If you don't use the bootloader I mention below, use the file firmware.hex.
If you want to use the bootloader too, use the (merged) file firmware_bootloader.hex instead:
Notice the difference in the efuse. The value 0xfe is neccessary because the bootloader must be able to program the device. For the meaning of the values of the fuses, have at look at the datasheet for the ATtiny85 or just use the very handy AVR Fuse Calculator from Engbedded.
After you have programmed the stick, you already might want to test it. To do so, just plug it into one of your USB ports and have a look at dmesg. If you have used the version with bootloader you will see a message about a Product USBasp, that is the bootloader which is visible to the system for some seconds after you have plugged in the device. If you don't use the firmware with the bootloader you only will see a message which tells you that a i2c-tiny-usb device is connected.
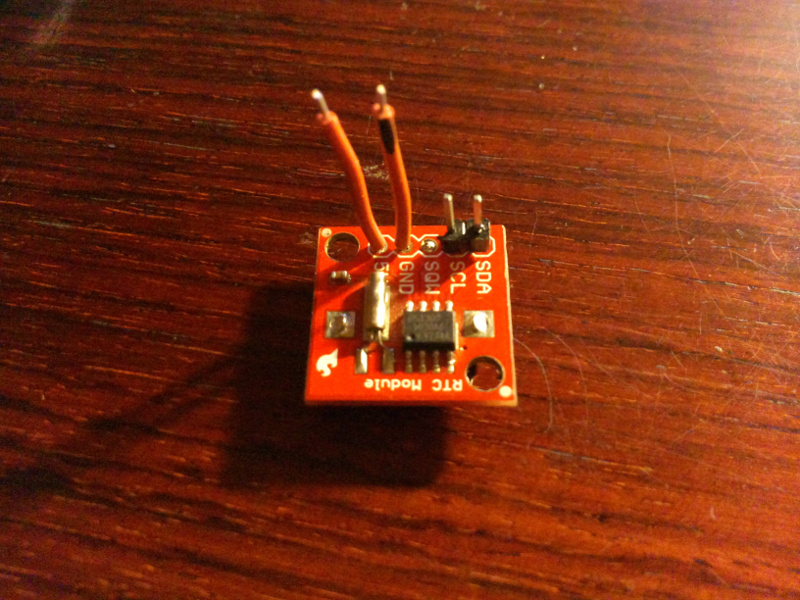
Soldering the device with the Real Time Clock Module is relatively easy. Just four connections have to be done. First solder two cables to the Real Time Clock Module, using the holes labeled GND and 5V at the module. Make them at least 2.5cm long and mark the one at GND with some black marker, if you are using the same color for both cables as I have done it. Then you have to solder two pins to the holes marked as SCL and SDA. Using pins instead of another two cables will give the final device some stability. Have a look at the picture here as reference:
Now solder the two cables to the AVR stick. Use the labeled picture above and/or the one below as reference.
After that step, use some tape of about 1 cm x 1 cm on top of the module, especially above the crystal. This makes sure the electronics of the module won't get in contact with the electronics of the stick after you have done the final step:
Solder the two pins into the holes labeled as PB3 and PB4 on the stick. Be sure that the side of the module which carries the DS1307 is above the side of the stick which carries the ATtiny85. Have a look at the labeled picture above and the picture of the final device on top as reference.
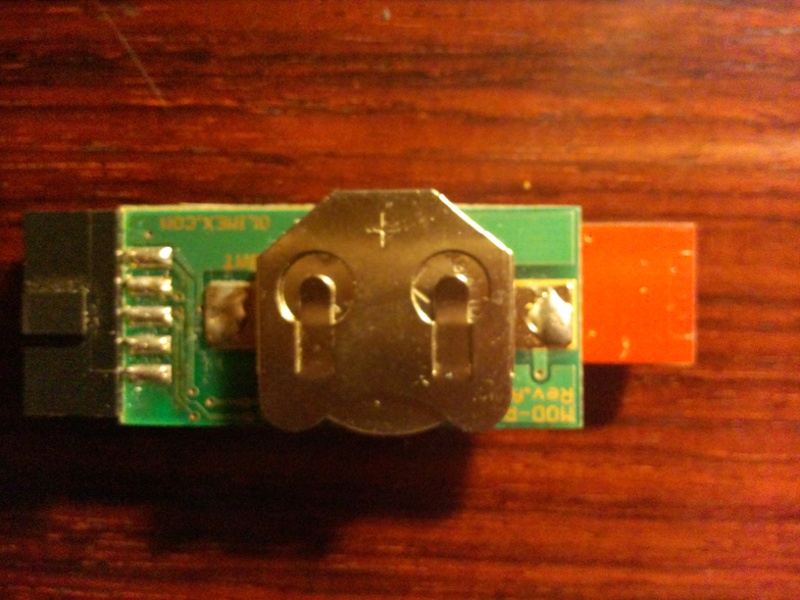
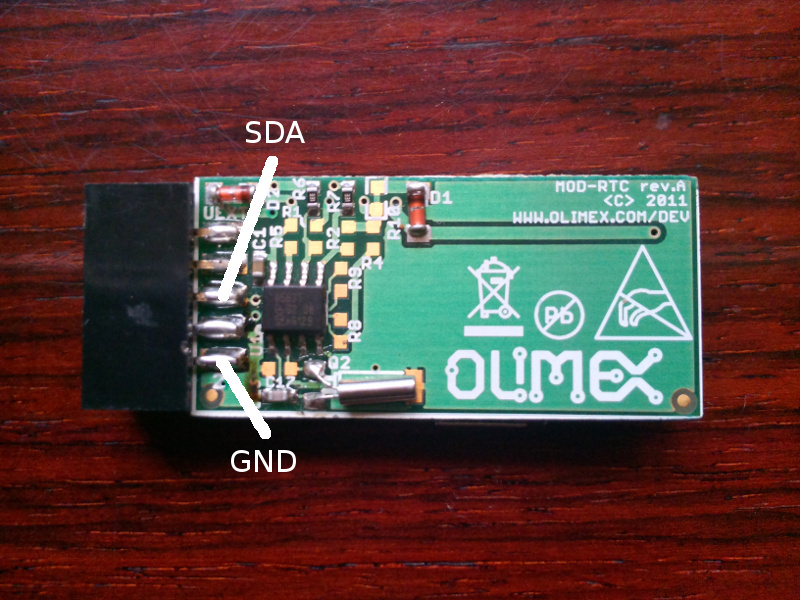
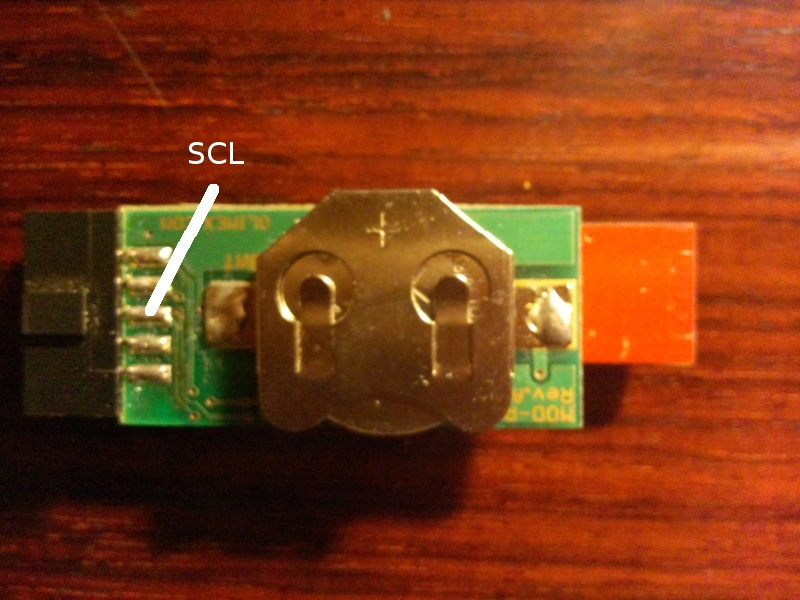
Using the MOD-RTC is even easier. To be able to still use it with devices from Olimex which have an UEXT connector like the Arduino Leonardo clone OLIMEXINO-32U4, I've only connected 3 cables (GND, SDA and SCL), leaving the RTC always powered by the battery. Use the below two pictures and the labeled picture above as reference. And don't make the same fault as I did, trying to solder some cable to one side of those small SMD resistors. I've got disturbed while I did that, which resulted in the whole mess which is visible in the picture on top. I've lost one of those very tiny resistors (and never found it again on my desk after the disruption), so I've used a normal resistor to replace it.
Afterwards just use some double-sided tape to attach the MOD-RTC to the AVR Stick.
Done. You can put away your soldering iron.
With the i2c-tiny-usb kernel driver modified by my patch just add the following to the kernel command line:
I found it necessary to use the above delay, otherwise the clock wasn't found every time. I assume it's because the ATtiny85 on the AVR Stick doesn't run with 12MHz but with some calibrated 16.5MHz clock which confuses the timing of the i2c-part in the firmware.
If you use the MOD-RTC, the kernel parameter has to be
instead.
Be sure to not built the i2c-tiny-usb driver as a module (and the rtc-ds1307 or the rtc-pcf8563 driver too), otherwise it will be loaded only after userspace got active, so you will likely have the same problem as I describe below. Depending on your setup, you could also add rootwait=3, that would make sure the kernel will wait same time before it really boots, so the device is really up when the userspace starts. Also don't forget to enable CONFIG_RTC_HCTOSYS in the kernel config, otherwise the time wouldn't be set automatically using the RTC.
If you don't want to build such a modified kernel driver, you can activate the usb-rtc from the userspace like that (replace N with whatever is necessary on your system):
Unfortunately that might have some implications because the date/time will not be correct until you have done that, however you prefer to do that. My suggestion is to do it using a rule for udev, but even that might be too late for some needs (because everything which is started before such a rule was processed still got the wrong time, which includes, most likely, the stuff responsible to mount and fsck your hard drives). So double check if your solution will really work, including what happens (at boot) if the partitions were not unmounted cleanly before or a fsck is scheduled (hint: forcefsck). Many stuff expects a monotone growing time which you won't have across multiple boots before you've enabled your shiny new usb-rtc. E.g. I've seen confused startups which asked the user to press a key or similiar, which isn't what you want if you aren't attending the startup/reboot or the system is headless.
If you later want to (re)program your AVR Stick, you might want to check out the ATtiny85 USB Boot Loader from Embedded Creations. It's some nifty software which enables you to program the AVR Stick by just plugging it into some USB port. Of course, initially you have to go through the pain of programing it into the AVR on the stick using a normal ISP programmer, but that just has to be done once.
To build a hex file which contains the bootloader and the i2c-tiny-usb firmware you could use a little tool Thomas Ilnseher has written and posted in a german thread, it is called hex_merge and you can download it here
As I don't have the need for a bootloader, I didn't test the bootloader itself. I've just had programmed it once on the stick and have seen that it identifies itself for a short time when I've plugged in the stick. But I've removed it afterwards again.
All trademarks are the property of their respective owners.
This page was born on 2012-11-13 and has last grown up on 2012-11-22.
(c) 2012 Alexander Holler
Impressum / imprint